JAAS authentication in Tomcat example
Introduction
Tomcat provides a default JAAS Realm implementation so developers may implement JAAS Login Modules and easily integrate them with the container. In this tutorial we will implement all the required components to put JAAS up and running in Tomcat web container.
This tutorial considers the following software and environment:
- Ubuntu 12.04
- JDK 1.7.0.09
- Tomcat 7.0.35
The Principals
One of the core concepts of JAAS is the existence of users and roles (roles are similar to groups in UNIX systems). Authorization may be issued to specific users or to roles. In JAAS this is concept is translated to Principals: Principals may represent users or roles independently. Let's define User and Role Principals to be used in this example:
package com.byteslounge.jaas;

import java.security.Principal;

public class UserPrincipal implements Principal {

  private String name;

  public UserPrincipal(String name) {
    super();
    this.name = name;
  }

  public void setName(String name) {
    this.name = name;
  }

  @Override
  public String getName() {
    return name;
  }

}
package com.byteslounge.jaas;

import java.security.Principal;

public class RolePrincipal implements Principal {

  private String name;

  public RolePrincipal(String name) {
    super();
    this.name = name;
  }

  public void setName(String name) {
    this.name = name;
  }

  @Override
  public String getName() {
    return name;
  }

}
Basically we are defining two simple Principals, each one of them requiring just a name so they may be promptly identified (a username or a role name). Remember that our principals must implement the java.security.Principal interface.
The Login Module
Now we need to define a Login Module that will actually implement the authentication process. The Login module must implement the javax.security.auth.spi.LoginModule interface:
package com.byteslounge.jaas;

import java.io.IOException;
import java.util.ArrayList;
import java.util.List;
import java.util.Map;

import javax.security.auth.Subject;
import javax.security.auth.callback.Callback;
import javax.security.auth.callback.CallbackHandler;
import javax.security.auth.callback.NameCallback;
import javax.security.auth.callback.PasswordCallback;
import javax.security.auth.callback.UnsupportedCallbackException;
import javax.security.auth.login.LoginException;
import javax.security.auth.spi.LoginModule;

public class BytesLoungeLoginModule implements LoginModule {

  private CallbackHandler handler;
  private Subject subject;
  private UserPrincipal userPrincipal;
  private RolePrincipal rolePrincipal;
  private String login;
  private List<String> userGroups;

  @Override
  public void initialize(Subject subject,
      CallbackHandler callbackHandler,
      Map<String, ?> sharedState,
      Map<String, ?> options) {

    handler = callbackHandler;
    this.subject = subject;
  }

  @Override
  public boolean login() throws LoginException {

    Callback[] callbacks = new Callback[2];
    callbacks[0] = new NameCallback("login");
    callbacks[1] = new PasswordCallback("password", true);

    try {
      handler.handle(callbacks);
      String name = ((NameCallback) callbacks[0]).getName();
      String password = String.valueOf(((PasswordCallback) callbacks[1])
          .getPassword());

      // Here we validate the credentials against some
      // authentication/authorization provider.
      // It can be a Database, an external LDAP,
      // a Web Service, etc.
      // For this tutorial we are just checking if
      // user is "user123" and password is "pass123"
      if (name != null &&
          name.equals("user123") &&
          password != null &&
          password.equals("pass123")) {

        // We store the username and roles
        // fetched from the credentials provider
        // to be used later in commit() method.
        // For this tutorial we hard coded the
        // "admin" role
        login = name;
        userGroups = new ArrayList<String>();
        userGroups.add("admin");
        return true;
      }

      // If credentials are NOT OK we throw a LoginException
      throw new LoginException("Authentication failed");

    } catch (IOException e) {
      throw new LoginException(e.getMessage());
    } catch (UnsupportedCallbackException e) {
      throw new LoginException(e.getMessage());
    }

  }

  @Override
  public boolean commit() throws LoginException {

    userPrincipal = new UserPrincipal(login);
    subject.getPrincipals().add(userPrincipal);

    if (userGroups != null && userGroups.size() > 0) {
      for (String groupName : userGroups) {
        rolePrincipal = new RolePrincipal(groupName);
        subject.getPrincipals().add(rolePrincipal);
      }
    }

    return true;
  }

  @Override
  public boolean abort() throws LoginException {
    return false;
  }

  @Override
  public boolean logout() throws LoginException {
    subject.getPrincipals().remove(userPrincipal);
    subject.getPrincipals().remove(rolePrincipal);
    return true;
  }

}
All the implemented methods are inherited from javax.security.auth.spi.LoginModule interface and will be called by Tomcat at specific moments during the authentication process.
The login method is responsible for checking if the credentials provided by the end user are valid. This check is made against any kind of authorization entity: It may be a database, a web service, a LDAP, etc. The developer may implement this credentials check in the way required by some specific use case.
Note: The login method must throw a LoginException in case of authentication failure.
In the presence of a successful authentication it should fetch the roles associated with the authenticating user. In this case we simulated and hard coded the admin role as a fetched role from the credentials provider for the current user.
The commit method is called after a successful login method execution and is responsible to store the user and roles obtained by the login method in the respective Subject and in the form of Principals. As you can see in the above module implementation, during the login method execution the credentials are obtained by the means of a callback. This callback is initialized in the initialize method together with Subject initialization.
The logout method is called when the user logs out of the system (and the application implements a logout mechanism). Finally the abort method is called when the login method fails to authenticate the user (throws a LoginException).
The web application
In this example we will secure a specific folder of a Java web application. The application will be very simple and its structure is the following:
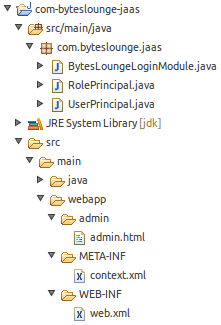
We will be securing the admin folder.
To accomplish this task we must define some configuration elements in web.xml file. These entries go directly under the web-app element:
<security-constraint>
  <web-resource-collection>
    <web-resource-name>Admin</web-resource-name>
    <url-pattern>/admin/*</url-pattern>
  </web-resource-collection>
  <auth-constraint>
    <role-name>admin</role-name>
  </auth-constraint>
</security-constraint>

<security-role>
  <role-name>admin</role-name>
</security-role>

<login-config>
  <auth-method>BASIC</auth-method>
  <realm-name>Admin</realm-name>
</login-config>
In security-constraint element we are defining that all resources under /admin folder are protected and only the admin role is granted to access the resources. All existing roles must be also defined in the security-role element. The login-config element defines how the credentials will be asked to the end user. In this example we will use the Basic authentication scheme (you may have different mechanisms like presenting a web form or page to the end user, but that will be covered in other tutorial).
Now we must define a new file named context.xml and place it under:
/META-INF/context.xml
<?xml version="1.0" encoding="UTF-8"?>
<Context>
  <Realm className="org.apache.catalina.realm.JAASRealm"
    appName="BytesLoungeLogin"
    userClassNames="com.byteslounge.jaas.UserPrincipal"
    roleClassNames="com.byteslounge.jaas.RolePrincipal" />
</Context>
Here we define the class that will implement the JAAS realm. We are using Tomcat default implementation: org.apache.catalina.realm.JAASRealm. We also define which classes will implement the user and roles Principals and we set them to be the ones we defined earlier in this tutorial (UserPrincipal and RolePrincipal). The attribute appName defines how the application will be globally identified by Tomcat in what matters to security configuration.
Finally we must define a JAAS configuration file. We will name it jaas.config and we will place it in Tomcat conf folder:
$CATALINA_BASE/conf/jaas.config
The file looks like the following:
BytesLoungeLogin {
    com.byteslounge.jaas.BytesLoungeLoginModule required debug=true;
};
This file defines the authentication configuration for BytesLoungeLogin application. Note that it's the same name we used in appName inside context.xml file just above.
Launching Tomcat and testing
Now lets launch Tomcat. We must set a JVM argument that tells Tomcat where the application configuration security file is located, the jaas.config file:
You may set this in the startup catalina.sh file.
When the server is up and running and we access the secure resource:
We will see the Basic authentication dialog asking for credentials:

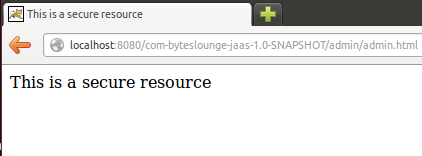
Now we insert the credentials we hard coded in our Login Module. Username: user123 and Password: pass123
We will be presented the secure resource. Access was granted.
The tutorial full source code is available for download at the end of this page.
Logout process
For more information about the user logout process please refer to the following article:
Keep in mind that this tutorial covered BASIC authentication so your browser will store the user credentials until it's closed.
This means that even if you logout the user, as soon a new request is made against a protected resource the browser will send the credentials again and automatically authenticate the user.
If you need to definitely logout the user and force the credentials to be inserted again you should look into form based authentication: JAAS form based authentication in Tomcat example